
Sharing the light...

Thousands of candles can be lighted from a single candle, and the life of the candle will not be shortened. Happiness never decreases by being shared. ~ Buddha
Candles have been illuminating our lives and celebrations
for more than 5,000 years, yet little is known about their origin. It is often noted that the Ancient Egyptians developed the first candles - torches made by soaking
the pithy core of reeds in melted animal fat - and were using wicked candles in 3,000 B.C. Often credited with developing the wicked candle before
that time, Ancient
Romans were know to dip rolled papyrus repeatedly in melted tallow or
beeswax. The resulting candles were used to brighten their homes, light a path for night travel, and highlight many religious ceremonies. Life was all aglow, and still is today. Candles, in the ranks with soap-making and bath salts, would be my next venture into ancient creation.
 I purchased bags of 100% soy flakes (because soy burns cleaner than any other wax), candle gel dye, fragrance oils for mixing scents, pre-tabbed wicks (it was just easier to use these with a zinc core for an even burn), and 8 ounce covered glass apothecary jars. Melting the wax can be done in a double boiler on the stove, or in a large glass Pyrex cup in the microwave. It is best to have a candy thermometer on hand so you can gauge the temperature each step of the way.
First, I measured about 1 pound of the soy flakes (16 oz.). Then I melted it in the microwave, heating the wax to 185 F. (It is also a good idea to pre-heat the glass to about 125 F to avoid "pull away".)
The next step is to add a couple drops of gel dye to achieve the desired shade, and stir. If you ever see little specks of solid color in the bottom of your candles try adding the color at a slightly higher temperature.
Now it is time to add the fragrance. I mixed a few different scents to create unique variations, making sure I only added about 1 ounce total fragrance for the batch. When adding fragrance, stir well and remove from the heat because you don't want it to evaporate out of the wax.

While the wax is cooling, place a pre-tabbed wick in the bottom of the glass jar mindful of keeping it centered. Once cooled to 125 F, carefully pour the soy wax into the apothecary jar.
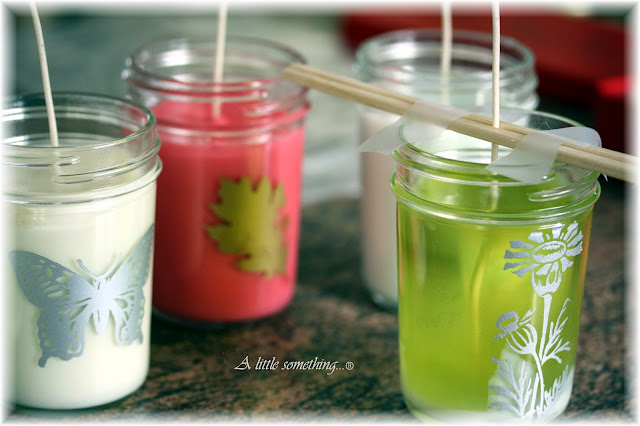
I used a pair of unbroken chop sticks with some tape to keep the wick centered and in place as I poured the wax and as it cooled. For best results, let the candle cool at room temperature overnight. Remember to trim the wick to 1/4 inch before lighting. Also, it is best to trim this way each time you light your candles.

I actually hand painted gold and silver motifs to each apothecary jar before I started any of the candle making process. Each one is different making the candle a little something extra special.

Before they all cooled completely, I taped a tiny post-it note to each so that I would remember what scent was which when it came time for the labels.

With a custom printed label, color coordinated to the wax shade and fragrance, I topped each candle with a copper wax seal.

Experimenting with the fragrances was a lot of fun! A blend of coconut oil and vanilla for Coconut Water; black cherry and cranberry oil in Berries and Cream; cucumber, melon and mango oil in Mango Infusion; and sugar cookie with vanilla bean for Sweet Sugar are just to name a few of the fruits of my labor. My way of sharing the light... xoxo-Sonya
First, I measured about 1 pound of the soy flakes (16 oz.). Then I melted it in the microwave, heating the wax to 185 F. (It is also a good idea to pre-heat the glass to about 125 F to avoid "pull away".)
The next step is to add a couple drops of gel dye to achieve the desired shade, and stir. If you ever see little specks of solid color in the bottom of your candles try adding the color at a slightly higher temperature.
Now it is time to add the fragrance. I mixed a few different scents to create unique variations, making sure I only added about 1 ounce total fragrance for the batch. When adding fragrance, stir well and remove from the heat because you don't want it to evaporate out of the wax.
While the wax is cooling, place a pre-tabbed wick in the bottom of the glass jar mindful of keeping it centered. Once cooled to 125 F, carefully pour the soy wax into the apothecary jar.

I used a pair of unbroken chop sticks with some tape to keep the wick centered and in place as I poured the wax and as it cooled. For best results, let the candle cool at room temperature overnight. Remember to trim the wick to 1/4 inch before lighting. Also, it is best to trim this way each time you light your candles.
I actually hand painted gold and silver motifs to each apothecary jar before I started any of the candle making process. Each one is different making the candle a little something extra special.

Before they all cooled completely, I taped a tiny post-it note to each so that I would remember what scent was which when it came time for the labels.

With a custom printed label, color coordinated to the wax shade and fragrance, I topped each candle with a copper wax seal.

Experimenting with the fragrances was a lot of fun! A blend of coconut oil and vanilla for Coconut Water; black cherry and cranberry oil in Berries and Cream; cucumber, melon and mango oil in Mango Infusion; and sugar cookie with vanilla bean for Sweet Sugar are just to name a few of the fruits of my labor. My way of sharing the light... xoxo-Sonya


0 comments